Community Training Classes & Labs > F5 Programmability Training Index
Lab 3.1: iWorkflow Onboarding
![digraph breadcrumb {
rankdir="LR"
ranksep=.4
node [fontsize=10,style="rounded,filled",shape=box,color=gray72,margin="0.05,0.05",height=0.1]
fontname = "arial-bold"
fontsize = 10
labeljust="l"
subgraph cluster_provider {
style = "rounded,filled"
color = lightgrey
height = .75
label = "Service Templates, Catalog and Deployments"
onboarding [label="Basics",color="steelblue1"]
templates [label="Templates"]
catalog [label="Catalog"]
deployments [label="Deployments"]
onboarding -> templates -> catalog -> deployments
}
}](../../_images/graphviz-bbf4a353dd34bd86a061bdf1f9df83aa1a409feb.png)
In this lab we will use the Runner, introduced in previous labs to complete the onboarding of the F5 iWorkflow device. The onboarding process creates the initial configuration required to start creation of Service Catalog Templates.
iWorkflow Overview
Before looking at the details of the onboarding process, lets discuss the new components iWorkflow introduces to our toolchain.
Device Discovery
In order for iWorkflow to interact with a BIG-IP device it must be discovered by iWorkflow. The device discovery process leverages the existing CMI Device Trust infrastructure on BIG-IP. Currently there is a limitation that a single BIG-IP device can only be ‘discovered’ by ONE of iWorkflow or BIG-IQ CM at a time. In this lab will we discover the existing BIG-IP devices from your lab environment.
Tenants & Connectors
iWorkflow implements a Tenant/Provider interface to enable abstracted deployment of L4-7 into various environment. In conjuction iWorkflow Connectors serve as the L1-3 Network and Device Onboarding automation component in the automation toolchain. In this lab we will create a ‘BIG-IP Connector’ for the BIG-IP devices in the lab environment. This connector will then allow you to drive a fully automated deployment from the iWorkflow Service Catalog.
iApp Templates
iWorkflow serves as an iApp Template Source-of-Truth for discovered BIG-IP devices. This allows an F5 administrator to manage iApp templates in a single place with iWorkflow installing required templates on BIG-IP devices as required during service deployment.
Onboarding Process Overview
The process implemented in the Lab 3.1 - iWorkflow Onboarding folder of
the Postman collection is diagrammed below.
Note
The diagram below represents environment variables in blue. You can follow the lines on each variable to understand which request populates the variable and how they are subsequently used.
![digraph iwf_onboarding {
rankdir = TB
fontname = "arial-bold"
ranksep = .2
splines = ortho
node [fontsize=10,style="rounded,filled",shape=box,color=navajowhite,margin="0.05,0.05",height=0.1]
edge [arrowsize=0.5,fontsize=8]
{
rank=min
start [label="Start iWorkflow Onboarding",color="chartreuse3"]
}
subgraph cluster1 {
style = "rounded,filled"
color = lightgrey
auth_start [label="Token-Based Authentication",color="navajowhite3"]
{
rank=same
iwf_auth_token [color=cadetblue3]
auth_gettoken [label="Retrieve Authentication Token"]
}
auth_verify [label="Verify Authentication Works"]
auth_settimeout [label="Set Auth Token Timeout"]
}
subgraph cluster2 {
style = "rounded,filled"
color = lightgrey
discover_start [label="Discover BIG-IP Devices",color="navajowhite3"]
{
rank=same
discover_bip_a [label="Discover BIG-IP A"]
iwf_bigip_a_uuid [color=cadetblue3]
}
{
rank=same
discover_bip_b [label="Discover BIG-IP B"]
iwf_bigip_b_uuid [color=cadetblue3]
}
discover_get [label="Get Discovered Devices"]
discover_check_state [label="state=ACTIVE",color=orange2]
}
subgraph cluster3 {
style = "rounded,filled"
color = lightgrey
create_start [label="Create iWorkflow Tenant",color="navajowhite3"]
{
create_tenant [label="Create iWorkflow Tenant &\nBIG-IP Connector"]
create_tenant_user [label="Create Tenant User"]
create_role [label="Assign User to Tenant Admin Role"]
}
{
rank=same
create_connector [label="Create a BIG-IP Connector"]
iwf_connector_uuid [color=cadetblue3]
}
create_assign [label="Assign Connector to Tenant"]
}
subgraph cluster4 {
style = "rounded,filled"
color = lightgrey
iapp_start [label="Install App Services\niApp Template",color="navajowhite3"]
{
rank=same
iapp_install [label="Install App Services\nTemplate on iWorkflow"]
iwf_appsvcs_name [color=cadetblue3]
}
}
{
rank=max
end [label="End iWorkflow Onboarding",color=indianred1]
}
/* Imperative Process Flow */
{
edge[style=solid]
start -> auth_start
auth_start -> auth_gettoken -> auth_verify -> auth_settimeout -> discover_start
discover_start -> discover_bip_a -> discover_bip_b -> discover_get -> discover_check_state
discover_check_state -> create_start [taillabel="Yes "]
discover_check_state -> discover_get [taillabel="No "]
create_start -> create_tenant -> create_tenant_user -> create_role -> create_connector -> create_assign -> iapp_start
iapp_start -> iapp_install -> end
}
/* Conditionals */
/* Variable Read/Writes */
{
constraint=false
edge[style=dashed]
auth_gettoken -> iwf_auth_token
iwf_auth_token -> {auth_verify auth_settimeout}
iwf_auth_token -> {discover_bip_a discover_bip_b discover_get}
iwf_auth_token -> {create_tenant create_tenant_user create_role create_connector create_assign}
iwf_auth_token -> {iapp_install}
discover_bip_a -> iwf_bigip_a_uuid
iwf_bigip_a_uuid -> create_connector
discover_bip_b -> iwf_bigip_b_uuid
iwf_bigip_b_uuid -> create_connector
create_connector -> iwf_connector_uuid -> create_assign
iapp_install -> iwf_appsvcs_name
}
}](../../_images/graphviz-3ec39b8eb874bf6480e6224415153337496292d7.png)
Task 1 - Onboard iWorkflow using Runner
In this task we will use the Runner to execute a series of
requests contained in the Lab 3.1 - iWorkflow Onboarding folder.
Perform the following steps to build the cluster:
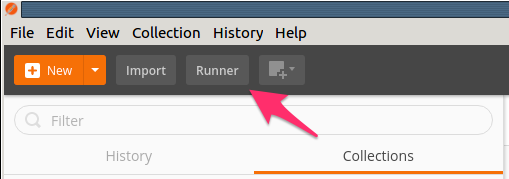
Click the Runner button at the top right of your Postman window:
Select the
F5 Programmability: Class 1Collection then theLab 3.1 - iWorkflow Onboardingfolder. Next, be sure the environment is set toF5 Programmability: Class 1: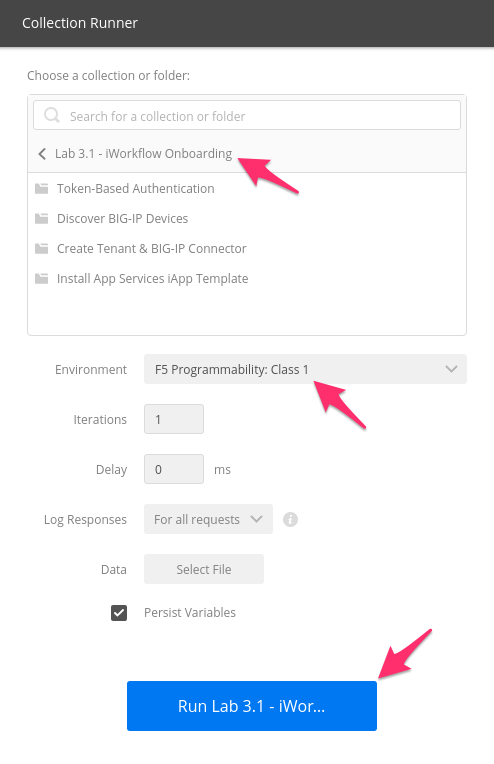
Click the Run Lab 3.1 - iWor… button
The results window will now populate. You will see each request in the folder is sent and it’s associated test results are displayed on the screen. Onboarding iWorkflow can take a few minutes. You can follow the progress by scrolling down the results window.
Once the Run Summary button appears the folder has finished running. You should have 0 failures and the last item in the request list should be named
Install App Services Template on iWorkflow
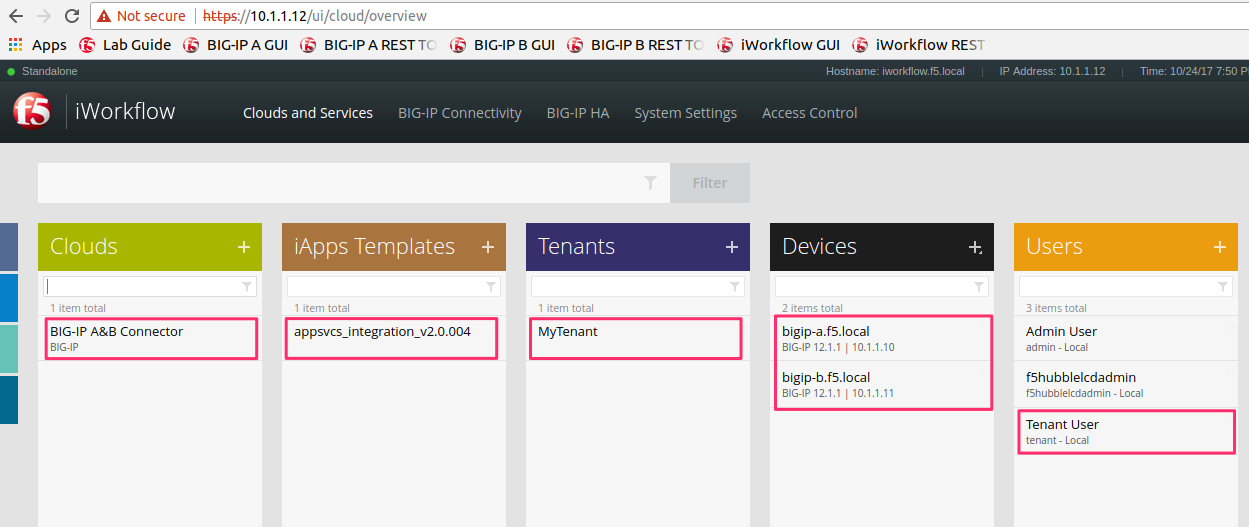
At this point you can log into iWorkflow using Chrome at
https://10.1.1.12andadmin/admincredentials. Click Clouds and Services at the top of the window:
Browse the various panes to see what was created: